> ## Documentation Index
> Fetch the complete documentation index at: https://qovery-docs-new-messaging-and-agent-tasks.mintlify.site/llms.txt
> Use this file to discover all available pages before exploring further.
# Install Qovery on Azure
> Complete guide to installing Qovery on Microsoft Azure with AKS
Install Qovery on your Azure account and deploy a fully managed Kubernetes cluster (AKS) in less than 20 minutes.
Already have a Kubernetes cluster? See the [BYOK guide](/getting-started/installation/kubernetes) instead.
## Overview
Qovery simplifies Azure Kubernetes Service (AKS) management by:
* Automating cluster creation and configuration
* Managing networking, load balancers, and DNS
* Providing built-in monitoring and logging
* Handling rolling updates and scaling
* Securing your infrastructure with best practices
Qovery creates and manages your AKS cluster automatically
Best practices for security, networking, and reliability
Automatic node scaling based on workload
Deploy across Azure regions worldwide
## Prerequisites
Before you begin, ensure you have:
**Azure Account**: Active Azure subscription with admin access
**Azure Tenant**: Access to an Azure Active Directory tenant
**Qovery Account**: Free account at
[console.qovery.com](https://console.qovery.com/signup)
**Permissions**: Ability to create service principals and assign roles
### Required Azure Permissions
Your Azure account needs these permissions:
* Create and manage AKS clusters
* Create service principals
* Assign contributor role
* Manage virtual networks
* Create resource groups
## Step 1: Create Azure Credentials
Qovery needs credentials to manage resources in your Azure subscription. We use a secure service principal approach that avoids storing long-lived credentials.
### Get Your Azure IDs
1. Go to [Azure Portal](https://portal.azure.com)
2. Navigate to **Azure Active Directory**
3. Click **Overview** in the left sidebar
4. Copy your **Tenant ID** (also called Directory ID)
You can also find it directly at: [portal.azure.com/#view/Microsoft\_AAD\_IAM/TenantProperties.ReactView](https://portal.azure.com/#view/Microsoft_AAD_IAM/TenantProperties.ReactView)
The Tenant ID is a GUID that looks like: `12345678-1234-1234-1234-123456789abc`
1. In Azure Portal, go to **Subscriptions**
2. Click on the subscription you want to use
3. Copy the **Subscription ID** from the overview page
You can also find it at: [portal.azure.com/#view/Microsoft\_Azure\_Billing/SubscriptionsBlade](https://portal.azure.com/#view/Microsoft_Azure_Billing/SubscriptionsBlade)
Make sure the subscription is **active** and has billing enabled. Qovery cannot create resources in disabled subscriptions.
### Generate Installation Command
1. Go to [Qovery Console](https://console.qovery.com)
2. Go to your organization overview and click on the **Clusters** tab
3. Click **Create Cluster**
4. Select **Azure** as the cloud provider
1. Enter your **Tenant ID**
2. Enter your **Subscription ID**
3. Click **Next**
Qovery will generate a secure installation command for you.
Copy the generated command to your clipboard.
This command creates a service principal using Azure's app registration.
### Run Installation Script
1. In Azure Portal, click the **Cloud Shell** icon (>\_) in the top navigation bar
2. **Important**: Select **Bash** mode (not PowerShell)
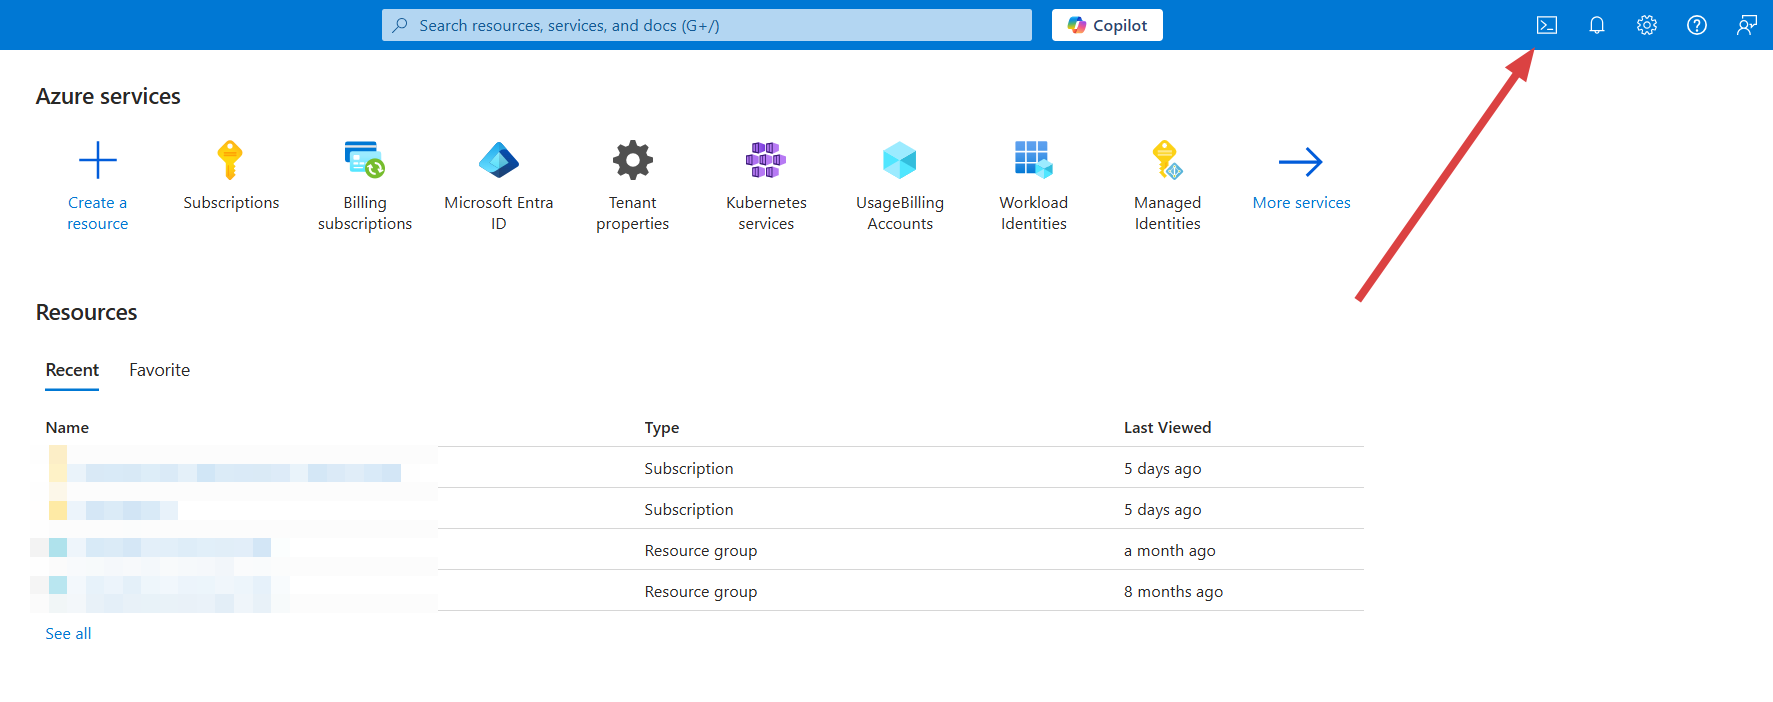 The script must run in **Bash mode**. If you're in PowerShell, click the dropdown and switch to Bash.
1. Paste the command from Qovery into Azure Cloud Shell
2. Press **Enter**
3. Review the subscription details displayed
4. The script will create a service principal and assign necessary permissions
**Example output:**
```bash theme={null}
Creating service principal for Qovery...
Service principal created successfully!
Assigning Contributor role...
✓ Credentials configured successfully
Subscription ID: 12345678-1234-1234-1234-123456789abc
Tenant ID: 87654321-4321-4321-4321-cba987654321
```
The credentials are automatically linked to your Qovery organization.
If you have multiple subscriptions, you can specify which one to use by passing it as a parameter to the script.
Qovery requires these Azure permissions to manage your infrastructure:
* **Contributor Role**: Full access to create and manage resources (AKS, VMs, VNets, Load Balancers, etc.)
* **Resource Group Management**: Create and manage resource groups
* **Azure Kubernetes Service**: Create and manage AKS clusters
* **Virtual Network**: Configure VNets, subnets, NSGs, and NAT Gateways
* **Compute**: Provision VM Scale Sets for node pools
* **Storage**: Create and manage Managed Disks for persistent storage
* **DNS**: Configure DNS zones and records
The service principal created by the script is assigned the **Contributor** role at the subscription level, which provides all necessary permissions.
A service principal is an identity created for use with applications, hosted services, and automated tools to access Azure resources. It's similar to a "service account" in other cloud providers.
**Key benefits:**
* **Security**: No need to share personal Azure credentials
* **Scope Control**: Permissions limited to specific subscription
* **Auditability**: All actions tracked in Azure Activity Log
* **Revocable**: Can be deleted without affecting user accounts
The service principal uses certificate-based authentication, which is more secure than password-based authentication.
To rotate Azure credentials:
1. In Azure Portal, go to **Azure Active Directory** → **App registrations**
2. Find the Qovery service principal (name starts with `qovery-`)
3. Go to **Certificates & secrets**
4. Add a new certificate or client secret
5. Run the Qovery credential creation script again to generate new credentials
6. Update credentials in Qovery Console
7. Wait 24 hours to ensure all systems use new credentials
8. Remove the old certificate/secret in Azure Portal
Qovery uses certificate-based authentication by default, which is more secure than client secrets.
Yes! If you have an existing service principal with the Contributor role, you can use it instead of creating a new one. However, ensure it has:
* Contributor role at the subscription level (or at minimum, the resource group where clusters will be created)
* Certificate or client secret configured
* No expiration date conflicts with your security policies
You'll need to manually provide the credentials to Qovery Console instead of using the automated script.
**Common issues and solutions:**
**"Insufficient privileges"**:
* You need at least "User Access Administrator" or "Owner" role to create service principals
* Contact your Azure administrator for assistance
**"PowerShell mode detected"**:
* The script only runs in Bash mode
* Click the dropdown in Cloud Shell and select "Bash"
**"Subscription not found"**:
* Verify the Subscription ID is correct
* Ensure the subscription is active and not disabled
* Check you have access to the subscription
**"Tenant ID mismatch"**:
* Verify you're logged into the correct Azure tenant
* Some accounts have access to multiple tenants - switch if needed
## Step 2: Configure Your Cluster
Now configure your AKS cluster settings in the Qovery console.
### Basic Configuration
Choose a descriptive name for your cluster:
* `production-aks`
* `staging-azure`
* `dev-aks-eastus`
Use naming conventions that indicate environment and region for easier management.
Choose an Azure region closest to your users:
**North America:**
* `eastus` - East US (Virginia)
* `eastus2` - East US 2 (Virginia)
* `westus2` - West US 2 (Washington)
* `centralus` - Central US (Iowa)
**Europe:**
* `westeurope` - West Europe (Netherlands)
* `northeurope` - North Europe (Ireland)
* `uksouth` - UK South (London)
* `francecentral` - France Central (Paris)
**Asia Pacific:**
* `southeastasia` - Southeast Asia (Singapore)
* `eastasia` - East Asia (Hong Kong)
* `japaneast` - Japan East (Tokyo)
* `australiaeast` - Australia East (Sydney)
Choose a region that complies with your data residency requirements.
Select the Azure credentials you created in Step 1.
If you need to create new credentials, click **Add new credentials** and repeat Step 1.
### Node Pool Configuration
Configure the VM sizes for your AKS node pools:
**Development/Testing:**
* `Standard_B2s` (2 vCPU, 4GB RAM)
* `Standard_B2ms` (2 vCPU, 8GB RAM)
* `Standard_B2als_v2` (2 vCPU, 4GB RAM)
**General Purpose Production (v3):**
* `Standard_D2s_v3` (2 vCPU, 8GB RAM)
* `Standard_D4s_v3` (4 vCPU, 16GB RAM)
**General Purpose Production (v5, recommended):**
* `Standard_D2ads_v5` (2 vCPU, 8GB RAM)
* `Standard_D4ads_v5` (4 vCPU, 16GB RAM)
* `Standard_D8ads_v5` (8 vCPU, 32GB RAM)
**General Purpose Production (v6, latest generation):**
* `Standard_D2ads_v6` (2 vCPU, 8GB RAM)
* `Standard_D4ads_v6` (4 vCPU, 16GB RAM)
* `Standard_D4alds_v6` (4 vCPU, 8GB RAM)
**Compute Optimized:**
* `Standard_F2s_v2` (2 vCPU, 4GB RAM)
* `Standard_F4s_v2` (4 vCPU, 8GB RAM)
**Memory Optimized:**
* `Standard_E2s_v3` (2 vCPU, 16GB RAM)
* `Standard_E4s_v3` (4 vCPU, 32GB RAM)
* `Standard_E2ads_v5` (2 vCPU, 16GB RAM)
Select **multiple VM sizes** to give the cluster autoscaler flexibility in choosing the most cost-effective options. Both v5 and v6 series are available and offer improved price-performance over v3.
All Azure regions supported by Qovery have **3 availability zones** (zones 1, 2, and 3).
Qovery automatically spreads node groups across all available zones for high availability:
* **Zone 1, Zone 2, Zone 3**: each gets a dedicated node group
* Nodes are evenly distributed across zones with any remainder assigned to Zone 1
* This provides **zone-level redundancy** and automatic failover at no extra cost
No manual zone configuration is required: Qovery handles this automatically during cluster creation.
**Example Configuration:**
```yaml theme={null}
Node Pool Settings:
- Standard_B2s (2 vCPU, 4GB) - Development workloads
- Standard_D2ads_v5 (2 vCPU, 8GB) - General purpose
- Standard_D4ads_v6 (4 vCPU, 16GB) - Larger workloads
- Standard_F4s_v2 (4 vCPU, 8GB) - CPU-intensive tasks
```
### Networking Configuration
Qovery automatically configures Azure networking:
**What's Created:**
* Virtual Network (VNet) with CIDR `10.0.0.0/16`
* Public subnet for load balancers
* Private subnets for nodes
* NAT Gateway for outbound internet access
* Network Security Groups (NSGs)
* Azure Load Balancer for ingress
**VNet Peering:**
Configure VNet peering to connect to existing Azure resources (databases, storage, etc.).
**Custom CIDR:**
Change the default VNet CIDR if it conflicts with your existing networks.
**Private Cluster:**
Enable private cluster mode to remove public API endpoints (requires VPN or ExpressRoute).
## Step 3: Deploy Your Cluster
Review all your cluster settings:
* Cluster name
* Region
* VM sizes
* Networking options
Click **Create and Deploy**
You can start configuring applications immediately! The cluster will be available once deployment completes.
Watch the deployment progress in the Qovery console.
**Timeline:**
* **0-5 min**: Creating Azure resources (Resource Group, VNet, NSGs)
* **5-10 min**: Provisioning AKS control plane
* **10-15 min**: Creating node pools
* **15-20 min**: Installing Qovery components (ingress, monitoring, etc.)
**Status indicators:**
* **Creating**: Infrastructure provisioning in progress
* **Running**: Cluster is ready to use
* **Error**: Check logs for troubleshooting
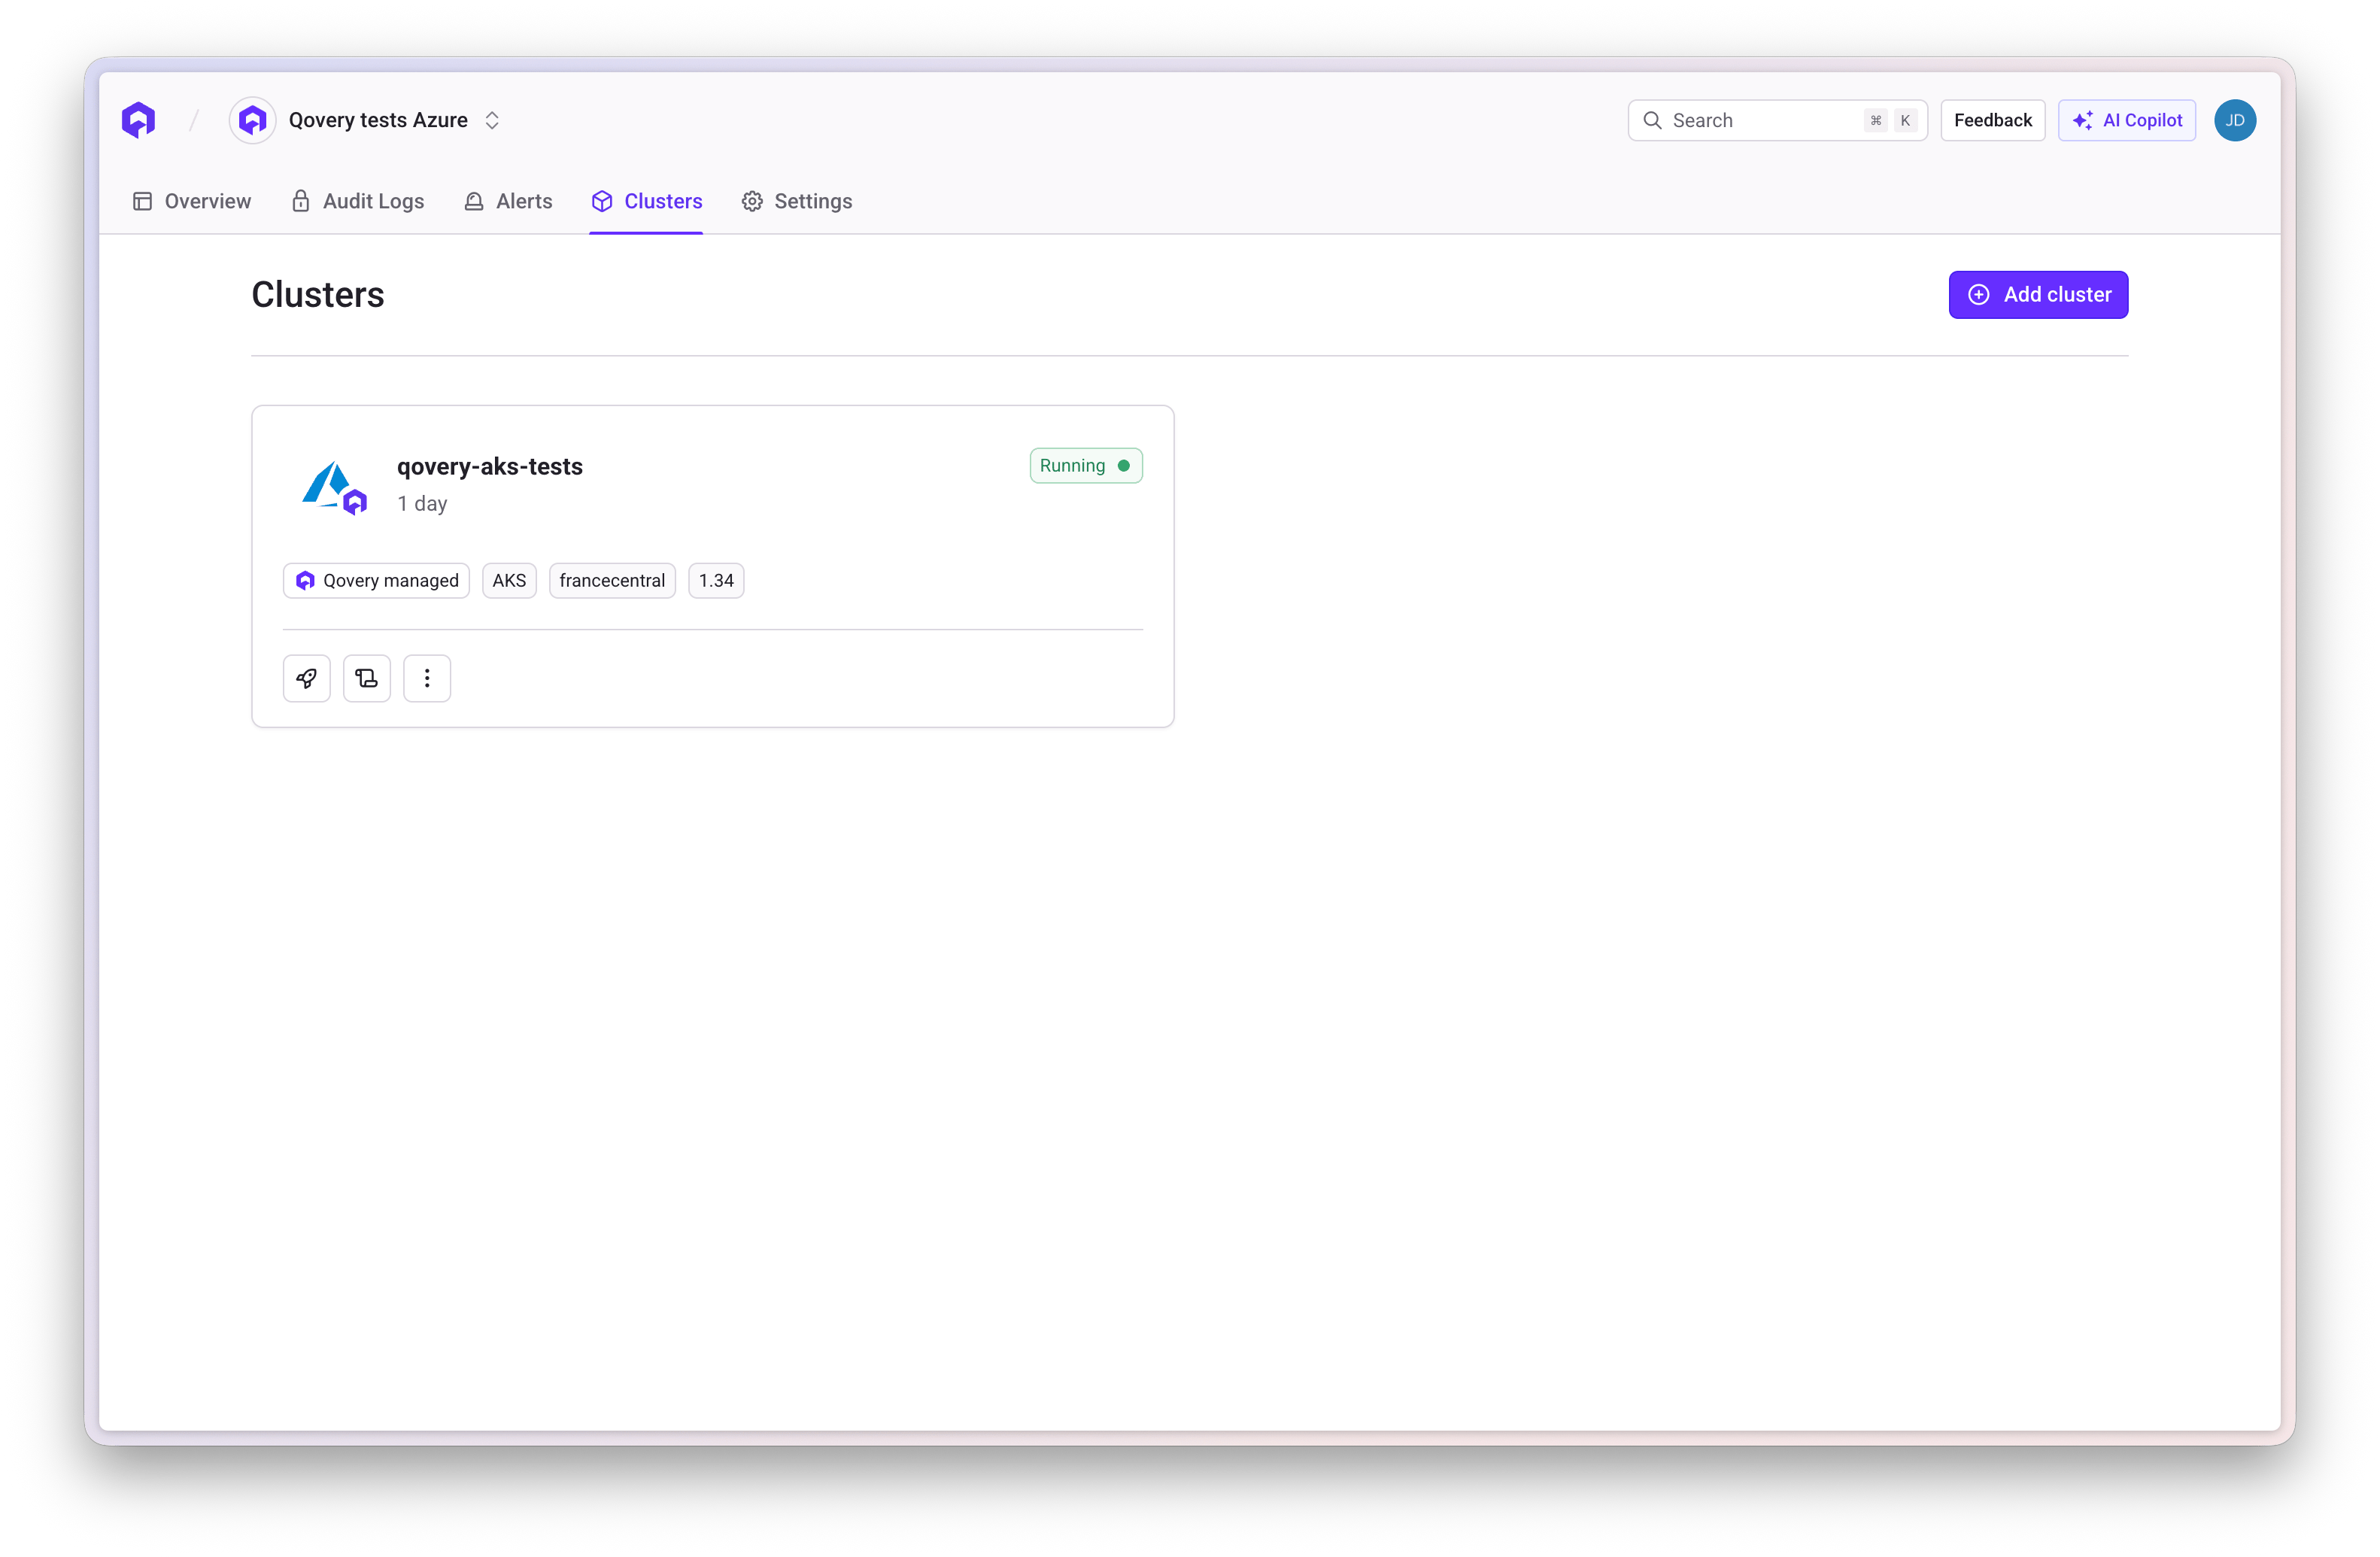
Once complete, your cluster will appear in the cluster list with status **Running**.
The script must run in **Bash mode**. If you're in PowerShell, click the dropdown and switch to Bash.
1. Paste the command from Qovery into Azure Cloud Shell
2. Press **Enter**
3. Review the subscription details displayed
4. The script will create a service principal and assign necessary permissions
**Example output:**
```bash theme={null}
Creating service principal for Qovery...
Service principal created successfully!
Assigning Contributor role...
✓ Credentials configured successfully
Subscription ID: 12345678-1234-1234-1234-123456789abc
Tenant ID: 87654321-4321-4321-4321-cba987654321
```
The credentials are automatically linked to your Qovery organization.
If you have multiple subscriptions, you can specify which one to use by passing it as a parameter to the script.
Qovery requires these Azure permissions to manage your infrastructure:
* **Contributor Role**: Full access to create and manage resources (AKS, VMs, VNets, Load Balancers, etc.)
* **Resource Group Management**: Create and manage resource groups
* **Azure Kubernetes Service**: Create and manage AKS clusters
* **Virtual Network**: Configure VNets, subnets, NSGs, and NAT Gateways
* **Compute**: Provision VM Scale Sets for node pools
* **Storage**: Create and manage Managed Disks for persistent storage
* **DNS**: Configure DNS zones and records
The service principal created by the script is assigned the **Contributor** role at the subscription level, which provides all necessary permissions.
A service principal is an identity created for use with applications, hosted services, and automated tools to access Azure resources. It's similar to a "service account" in other cloud providers.
**Key benefits:**
* **Security**: No need to share personal Azure credentials
* **Scope Control**: Permissions limited to specific subscription
* **Auditability**: All actions tracked in Azure Activity Log
* **Revocable**: Can be deleted without affecting user accounts
The service principal uses certificate-based authentication, which is more secure than password-based authentication.
To rotate Azure credentials:
1. In Azure Portal, go to **Azure Active Directory** → **App registrations**
2. Find the Qovery service principal (name starts with `qovery-`)
3. Go to **Certificates & secrets**
4. Add a new certificate or client secret
5. Run the Qovery credential creation script again to generate new credentials
6. Update credentials in Qovery Console
7. Wait 24 hours to ensure all systems use new credentials
8. Remove the old certificate/secret in Azure Portal
Qovery uses certificate-based authentication by default, which is more secure than client secrets.
Yes! If you have an existing service principal with the Contributor role, you can use it instead of creating a new one. However, ensure it has:
* Contributor role at the subscription level (or at minimum, the resource group where clusters will be created)
* Certificate or client secret configured
* No expiration date conflicts with your security policies
You'll need to manually provide the credentials to Qovery Console instead of using the automated script.
**Common issues and solutions:**
**"Insufficient privileges"**:
* You need at least "User Access Administrator" or "Owner" role to create service principals
* Contact your Azure administrator for assistance
**"PowerShell mode detected"**:
* The script only runs in Bash mode
* Click the dropdown in Cloud Shell and select "Bash"
**"Subscription not found"**:
* Verify the Subscription ID is correct
* Ensure the subscription is active and not disabled
* Check you have access to the subscription
**"Tenant ID mismatch"**:
* Verify you're logged into the correct Azure tenant
* Some accounts have access to multiple tenants - switch if needed
## Step 2: Configure Your Cluster
Now configure your AKS cluster settings in the Qovery console.
### Basic Configuration
Choose a descriptive name for your cluster:
* `production-aks`
* `staging-azure`
* `dev-aks-eastus`
Use naming conventions that indicate environment and region for easier management.
Choose an Azure region closest to your users:
**North America:**
* `eastus` - East US (Virginia)
* `eastus2` - East US 2 (Virginia)
* `westus2` - West US 2 (Washington)
* `centralus` - Central US (Iowa)
**Europe:**
* `westeurope` - West Europe (Netherlands)
* `northeurope` - North Europe (Ireland)
* `uksouth` - UK South (London)
* `francecentral` - France Central (Paris)
**Asia Pacific:**
* `southeastasia` - Southeast Asia (Singapore)
* `eastasia` - East Asia (Hong Kong)
* `japaneast` - Japan East (Tokyo)
* `australiaeast` - Australia East (Sydney)
Choose a region that complies with your data residency requirements.
Select the Azure credentials you created in Step 1.
If you need to create new credentials, click **Add new credentials** and repeat Step 1.
### Node Pool Configuration
Configure the VM sizes for your AKS node pools:
**Development/Testing:**
* `Standard_B2s` (2 vCPU, 4GB RAM)
* `Standard_B2ms` (2 vCPU, 8GB RAM)
* `Standard_B2als_v2` (2 vCPU, 4GB RAM)
**General Purpose Production (v3):**
* `Standard_D2s_v3` (2 vCPU, 8GB RAM)
* `Standard_D4s_v3` (4 vCPU, 16GB RAM)
**General Purpose Production (v5, recommended):**
* `Standard_D2ads_v5` (2 vCPU, 8GB RAM)
* `Standard_D4ads_v5` (4 vCPU, 16GB RAM)
* `Standard_D8ads_v5` (8 vCPU, 32GB RAM)
**General Purpose Production (v6, latest generation):**
* `Standard_D2ads_v6` (2 vCPU, 8GB RAM)
* `Standard_D4ads_v6` (4 vCPU, 16GB RAM)
* `Standard_D4alds_v6` (4 vCPU, 8GB RAM)
**Compute Optimized:**
* `Standard_F2s_v2` (2 vCPU, 4GB RAM)
* `Standard_F4s_v2` (4 vCPU, 8GB RAM)
**Memory Optimized:**
* `Standard_E2s_v3` (2 vCPU, 16GB RAM)
* `Standard_E4s_v3` (4 vCPU, 32GB RAM)
* `Standard_E2ads_v5` (2 vCPU, 16GB RAM)
Select **multiple VM sizes** to give the cluster autoscaler flexibility in choosing the most cost-effective options. Both v5 and v6 series are available and offer improved price-performance over v3.
All Azure regions supported by Qovery have **3 availability zones** (zones 1, 2, and 3).
Qovery automatically spreads node groups across all available zones for high availability:
* **Zone 1, Zone 2, Zone 3**: each gets a dedicated node group
* Nodes are evenly distributed across zones with any remainder assigned to Zone 1
* This provides **zone-level redundancy** and automatic failover at no extra cost
No manual zone configuration is required: Qovery handles this automatically during cluster creation.
**Example Configuration:**
```yaml theme={null}
Node Pool Settings:
- Standard_B2s (2 vCPU, 4GB) - Development workloads
- Standard_D2ads_v5 (2 vCPU, 8GB) - General purpose
- Standard_D4ads_v6 (4 vCPU, 16GB) - Larger workloads
- Standard_F4s_v2 (4 vCPU, 8GB) - CPU-intensive tasks
```
### Networking Configuration
Qovery automatically configures Azure networking:
**What's Created:**
* Virtual Network (VNet) with CIDR `10.0.0.0/16`
* Public subnet for load balancers
* Private subnets for nodes
* NAT Gateway for outbound internet access
* Network Security Groups (NSGs)
* Azure Load Balancer for ingress
**VNet Peering:**
Configure VNet peering to connect to existing Azure resources (databases, storage, etc.).
**Custom CIDR:**
Change the default VNet CIDR if it conflicts with your existing networks.
**Private Cluster:**
Enable private cluster mode to remove public API endpoints (requires VPN or ExpressRoute).
## Step 3: Deploy Your Cluster
Review all your cluster settings:
* Cluster name
* Region
* VM sizes
* Networking options
Click **Create and Deploy**
You can start configuring applications immediately! The cluster will be available once deployment completes.
Watch the deployment progress in the Qovery console.
**Timeline:**
* **0-5 min**: Creating Azure resources (Resource Group, VNet, NSGs)
* **5-10 min**: Provisioning AKS control plane
* **10-15 min**: Creating node pools
* **15-20 min**: Installing Qovery components (ingress, monitoring, etc.)
**Status indicators:**
* **Creating**: Infrastructure provisioning in progress
* **Running**: Cluster is ready to use
* **Error**: Check logs for troubleshooting
Once complete, your cluster will appear in the cluster list with status **Running**.
 ## What Gets Created
Qovery automatically provisions these Azure resources:
* **Resource Group**: Dedicated group for all cluster resources
* **AKS Cluster**: Managed Kubernetes cluster
* **Virtual Network**: Isolated network for your cluster
* **Subnets**: Public and private subnets
* **NAT Gateway**: Outbound internet connectivity
* **Network Security Groups**: Firewall rules
* **Azure Load Balancer**: Layer 4 load balancing
* **Application Gateway** (optional): Layer 7 load balancing
* **Public IP Addresses**: For ingress traffic
* **Private DNS Zone**: Internal service discovery
* **Virtual Machine Scale Sets**: Auto-scaling node pools
* **Managed Disks**: Persistent storage for nodes
* **System Node Pool**: Kubernetes system components
* **User Node Pools**: Your application workloads
* **NGINX Ingress Controller**: HTTP/HTTPS routing
* **Cert-Manager**: Automatic SSL/TLS certificates
* **Qovery Agent**: Cluster management
* **Monitoring Stack**: Metrics and logging
* **DNS Management**: Automatic domain configuration
## Post-Installation Steps
Once your cluster is running:
Follow the [Deploy Your First App](/getting-started/guides/getting-started/deploy-your-first-application) guide
[Set up your own domain](/getting-started/guides/advanced-tutorials/cloudflare-custom-domain) instead of the default Qovery domain
Configure [Azure Monitor](/configuration/integrations/observability/qovery-observe) or
[Datadog](/configuration/integrations/observability/datadog)
Set up backup policies for persistent data
## Troubleshooting
**Error**: "Failed to create service principal"
**Solutions:**
* Verify you have permissions to create service principals
* Check that your Azure subscription is active
* Ensure you're using Bash mode (not PowerShell) in Cloud Shell
* Verify Tenant ID and Subscription ID are correct
**Issue**: Cluster stuck in "Creating" state for over 30 minutes
**Solutions:**
* Check Azure quotas for your subscription (vCPUs, Public IPs)
* Verify the selected region has capacity
* Check Azure status page for outages
* Contact Qovery support if issue persists
**Error**: "Quota exceeded for resource"
**Solutions:**
1. Check your Azure quotas: [portal.azure.com/#view/Microsoft\_Azure\_Capacity/QuotaMenuBlade](https://portal.azure.com/#view/Microsoft_Azure_Capacity/QuotaMenuBlade)
2. Request quota increase through Azure Portal
3. Choose a different VM size or region
4. Reduce the number of nodes
**Common quota limits:**
* Total Regional vCPUs
* VM family specific vCPUs (D-series, F-series, etc.)
* Public IP addresses
* Load balancers
**Issue**: Applications can't access external services
**Solutions:**
* Verify NAT Gateway is properly configured
* Check Network Security Group rules
* Ensure subnet routing tables are correct
* Test connectivity from a pod: `kubectl run -it debug --image=nicolaka/netshoot --rm`
## Advanced Configuration
### Private Cluster Mode
For enhanced security, enable private cluster mode:
Private clusters require VPN or ExpressRoute to access the Kubernetes API.
Plan your network connectivity before enabling.
### VNet Peering
Connect your AKS cluster to existing Azure resources:
1. Create VNet peering from Qovery VNet to your VNet
2. Configure route tables
3. Update Network Security Groups
4. Test connectivity
### Custom DNS
Use your own DNS servers:
1. Configure custom DNS in VNet settings
2. Update CoreDNS configuration
3. Test name resolution
## Best Practices
Start with smaller VMs and scale up based on actual usage patterns
Configure Azure Monitor or third-party monitoring from day one
Use Azure AD integration and Kubernetes RBAC for access control
Keep your AKS cluster updated with the latest Kubernetes versions
Implement automated backups for persistent data and configurations
## Next Steps
Complete step-by-step deployment guide
Set up team access control
Automate deployments with GitHub Actions or Azure DevOps
Configure monitoring and alerting
## Additional Resources
* [Azure AKS Documentation](https://docs.microsoft.com/en-us/azure/aks/)
* [Azure Pricing Calculator](https://azure.microsoft.com/en-us/pricing/calculator/)
* [Qovery Status Page](https://status.qovery.com)
* [Qovery Kubernetes Changelog](https://www.qovery.com/changelog---kubernetes) - Kubernetes cluster related updates
## What Gets Created
Qovery automatically provisions these Azure resources:
* **Resource Group**: Dedicated group for all cluster resources
* **AKS Cluster**: Managed Kubernetes cluster
* **Virtual Network**: Isolated network for your cluster
* **Subnets**: Public and private subnets
* **NAT Gateway**: Outbound internet connectivity
* **Network Security Groups**: Firewall rules
* **Azure Load Balancer**: Layer 4 load balancing
* **Application Gateway** (optional): Layer 7 load balancing
* **Public IP Addresses**: For ingress traffic
* **Private DNS Zone**: Internal service discovery
* **Virtual Machine Scale Sets**: Auto-scaling node pools
* **Managed Disks**: Persistent storage for nodes
* **System Node Pool**: Kubernetes system components
* **User Node Pools**: Your application workloads
* **NGINX Ingress Controller**: HTTP/HTTPS routing
* **Cert-Manager**: Automatic SSL/TLS certificates
* **Qovery Agent**: Cluster management
* **Monitoring Stack**: Metrics and logging
* **DNS Management**: Automatic domain configuration
## Post-Installation Steps
Once your cluster is running:
Follow the [Deploy Your First App](/getting-started/guides/getting-started/deploy-your-first-application) guide
[Set up your own domain](/getting-started/guides/advanced-tutorials/cloudflare-custom-domain) instead of the default Qovery domain
Configure [Azure Monitor](/configuration/integrations/observability/qovery-observe) or
[Datadog](/configuration/integrations/observability/datadog)
Set up backup policies for persistent data
## Troubleshooting
**Error**: "Failed to create service principal"
**Solutions:**
* Verify you have permissions to create service principals
* Check that your Azure subscription is active
* Ensure you're using Bash mode (not PowerShell) in Cloud Shell
* Verify Tenant ID and Subscription ID are correct
**Issue**: Cluster stuck in "Creating" state for over 30 minutes
**Solutions:**
* Check Azure quotas for your subscription (vCPUs, Public IPs)
* Verify the selected region has capacity
* Check Azure status page for outages
* Contact Qovery support if issue persists
**Error**: "Quota exceeded for resource"
**Solutions:**
1. Check your Azure quotas: [portal.azure.com/#view/Microsoft\_Azure\_Capacity/QuotaMenuBlade](https://portal.azure.com/#view/Microsoft_Azure_Capacity/QuotaMenuBlade)
2. Request quota increase through Azure Portal
3. Choose a different VM size or region
4. Reduce the number of nodes
**Common quota limits:**
* Total Regional vCPUs
* VM family specific vCPUs (D-series, F-series, etc.)
* Public IP addresses
* Load balancers
**Issue**: Applications can't access external services
**Solutions:**
* Verify NAT Gateway is properly configured
* Check Network Security Group rules
* Ensure subnet routing tables are correct
* Test connectivity from a pod: `kubectl run -it debug --image=nicolaka/netshoot --rm`
## Advanced Configuration
### Private Cluster Mode
For enhanced security, enable private cluster mode:
Private clusters require VPN or ExpressRoute to access the Kubernetes API.
Plan your network connectivity before enabling.
### VNet Peering
Connect your AKS cluster to existing Azure resources:
1. Create VNet peering from Qovery VNet to your VNet
2. Configure route tables
3. Update Network Security Groups
4. Test connectivity
### Custom DNS
Use your own DNS servers:
1. Configure custom DNS in VNet settings
2. Update CoreDNS configuration
3. Test name resolution
## Best Practices
Start with smaller VMs and scale up based on actual usage patterns
Configure Azure Monitor or third-party monitoring from day one
Use Azure AD integration and Kubernetes RBAC for access control
Keep your AKS cluster updated with the latest Kubernetes versions
Implement automated backups for persistent data and configurations
## Next Steps
Complete step-by-step deployment guide
Set up team access control
Automate deployments with GitHub Actions or Azure DevOps
Configure monitoring and alerting
## Additional Resources
* [Azure AKS Documentation](https://docs.microsoft.com/en-us/azure/aks/)
* [Azure Pricing Calculator](https://azure.microsoft.com/en-us/pricing/calculator/)
* [Qovery Status Page](https://status.qovery.com)
* [Qovery Kubernetes Changelog](https://www.qovery.com/changelog---kubernetes) - Kubernetes cluster related updates